Manage customer return requests
Let customers request product returns from their order page, then review each product and start the approved return. Configure the feature from Settings > Orders and products properties > Configure, beside Enable customer product returns. Review requests from Orders > Customer Return Requests.
Staff need permission to view and manage order and product settings, and permission to view and edit return requests for the tasks they perform. Starting a return requires permission to manage order statuses; generating a label requires permission to edit orders. Payment link details require the ZidPay and payment link viewing permissions. Refunding online payments requires permission to view transactions and request refunds. Bulk editing also requires access to that feature in your plan and permission to edit products.
Set the return window and activate customer returns
Open Return policy from Configure.
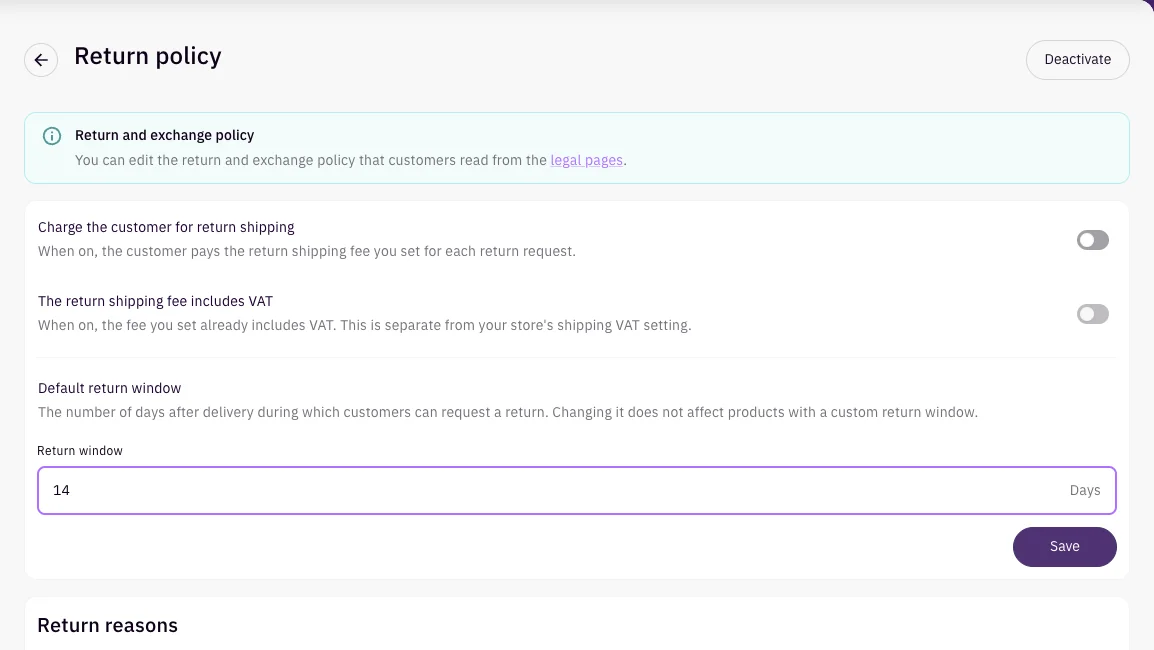
Enter Return window under Default return window. Use a whole number of days, at least 1. The window starts after delivery.
Select Save. A default window must be saved before activation is available.
Select Activate at the top of the page. To turn the feature off later, select Deactivate.
Changing the store default does not change products with a custom return window. To edit the policy text customers read, follow legal pages in the Return and exchange policy notice. See Legal pages.
Set the customer’s return shipping fee
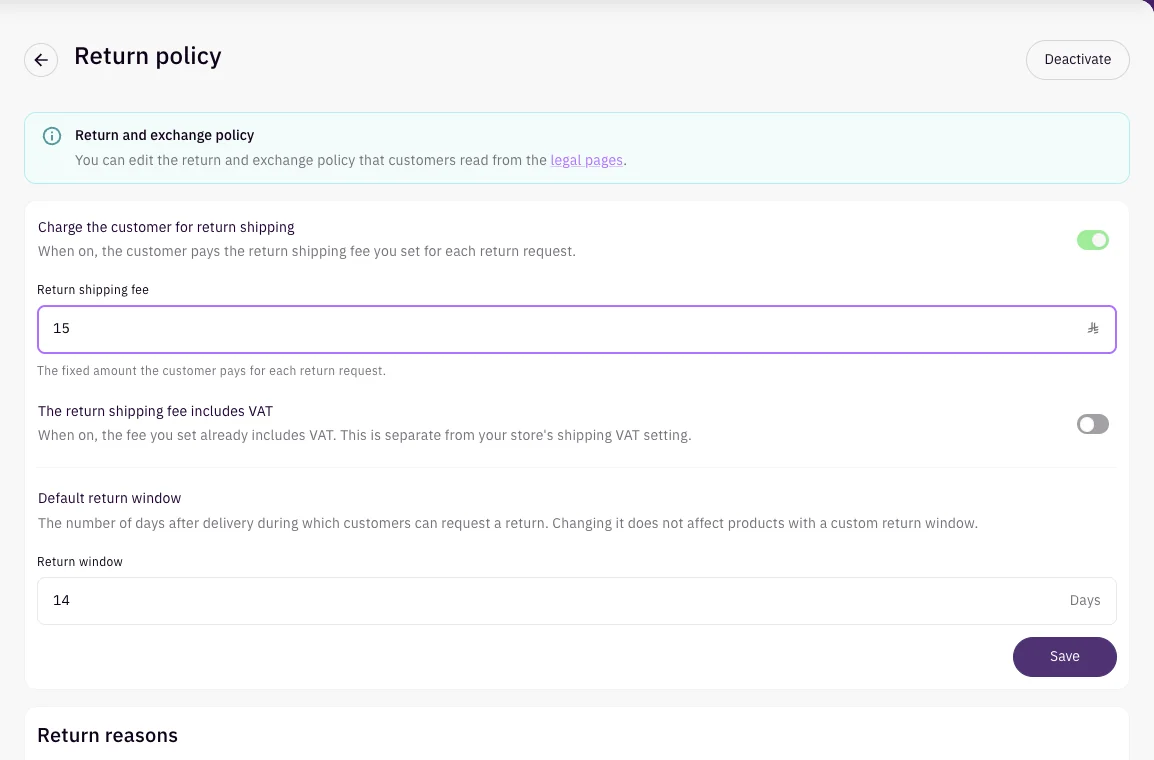
Turn on Charge the customer for return shipping if you want to charge a fixed amount for each return request.
Enter a positive amount in Return shipping fee.
Turn on The return shipping fee includes VAT if the amount you entered already includes VAT.
Select Save.
| Setting | What it controls |
|---|---|
| Charge the customer for return shipping | Whether the customer pays your fixed return shipping fee for a request. |
| Return shipping fee | The fixed charge per request, in your store’s currency. |
| The return shipping fee includes VAT | Whether your entered fee already includes VAT. This is independent of your store’s shipping VAT setting and is unavailable while the fee is off. |
The fee charged to the customer and the shipping provider’s label cost are separate amounts. When you generate a return label through Zid, the provider’s delivery cost is deducted from your wallet.
Add, edit or hide return reasons
Open Return reasons on the Return policy page.
Select Add another reason, enter Reason title, then select Add. A new reason is shown to customers by default.
To rename one of your reasons, expand its row, change Reason title, then select Edit.
To show or hide a reason for customers, change Show to customers beside that reason. This change saves directly.
To remove one of your saved reasons, expand it, select Delete, then confirm the deletion.
| Reason type | Available changes |
|---|---|
| Your store’s reasons | Rename, show or hide, and delete. |
| Zid’s global reasons | Show or hide. You cannot rename or delete them. |
Deleting a reason removes it from new requests; existing requests keep their recorded reason. Return reasons are shared with the direct return flow on an order.

Set a product’s return eligibility
Open the product from Products.
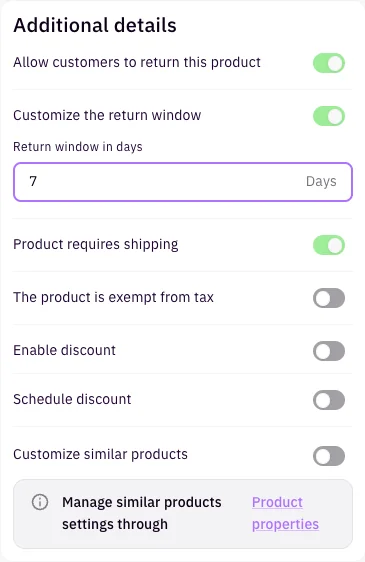
In Additional details, set Allow customers to return this product.
For a returnable product, leave Customize the return window off to use the store default, or turn it on and enter Return window in days. Use a whole number of at least 1.
Select Save.
You can prepare product return settings while customer returns are off; they apply when you activate the feature. Downloadable files and vouchers cannot be made returnable. Products with variants use the parent product’s return settings.
Edit return settings for several products
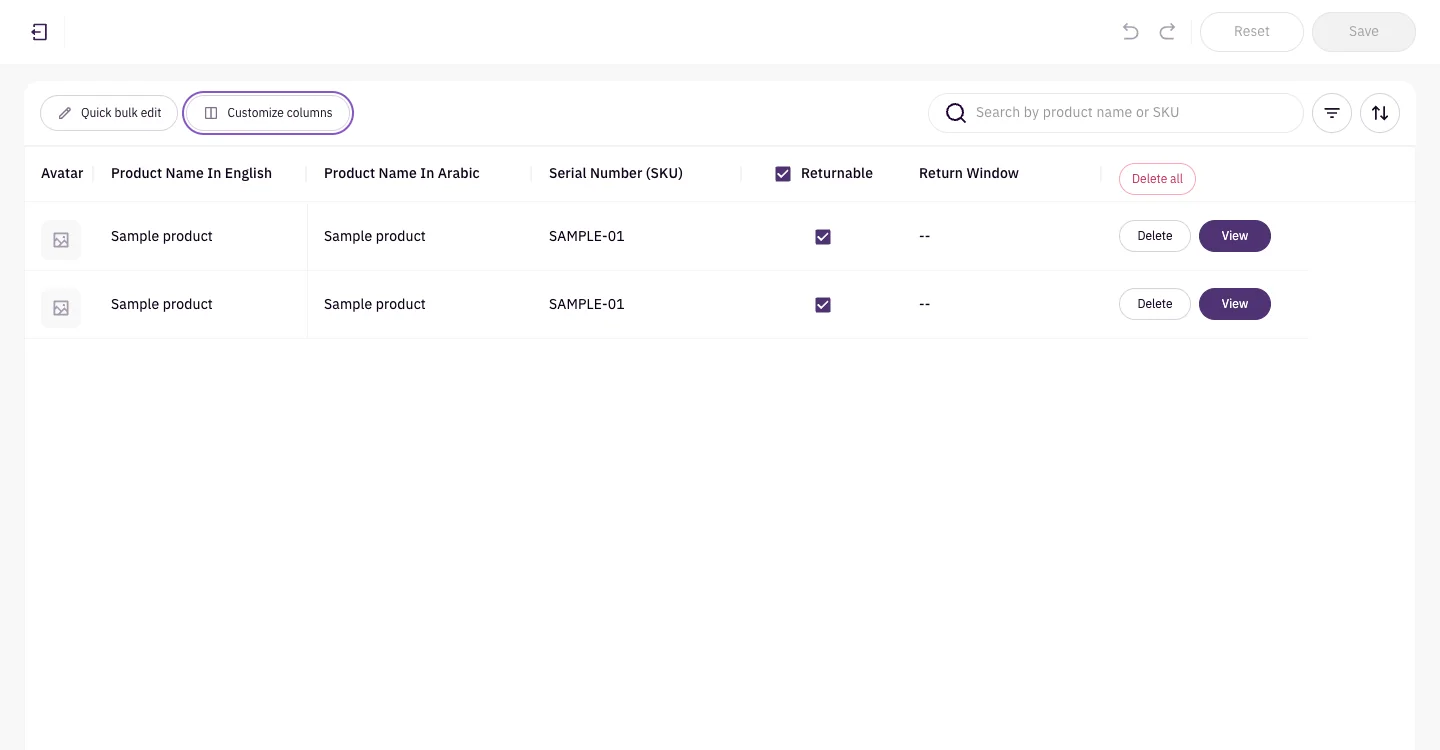
Open Bulk edit from Products.
Open Customize columns and show Returnable and Return window if they are hidden.
Change Returnable for the eligible parent products. You can also use the column’s checkbox to apply the returnable setting to eligible rows.
Enter a whole number of at least 1 in Return window for each returnable product that needs its own window. Clear the cell to use the store default; the inherited value appears as --.
Select Save.
These columns are available in the bulk editor when customer returns are active. Variant rows follow their parent, and downloadable files and vouchers cannot be enabled for returns.
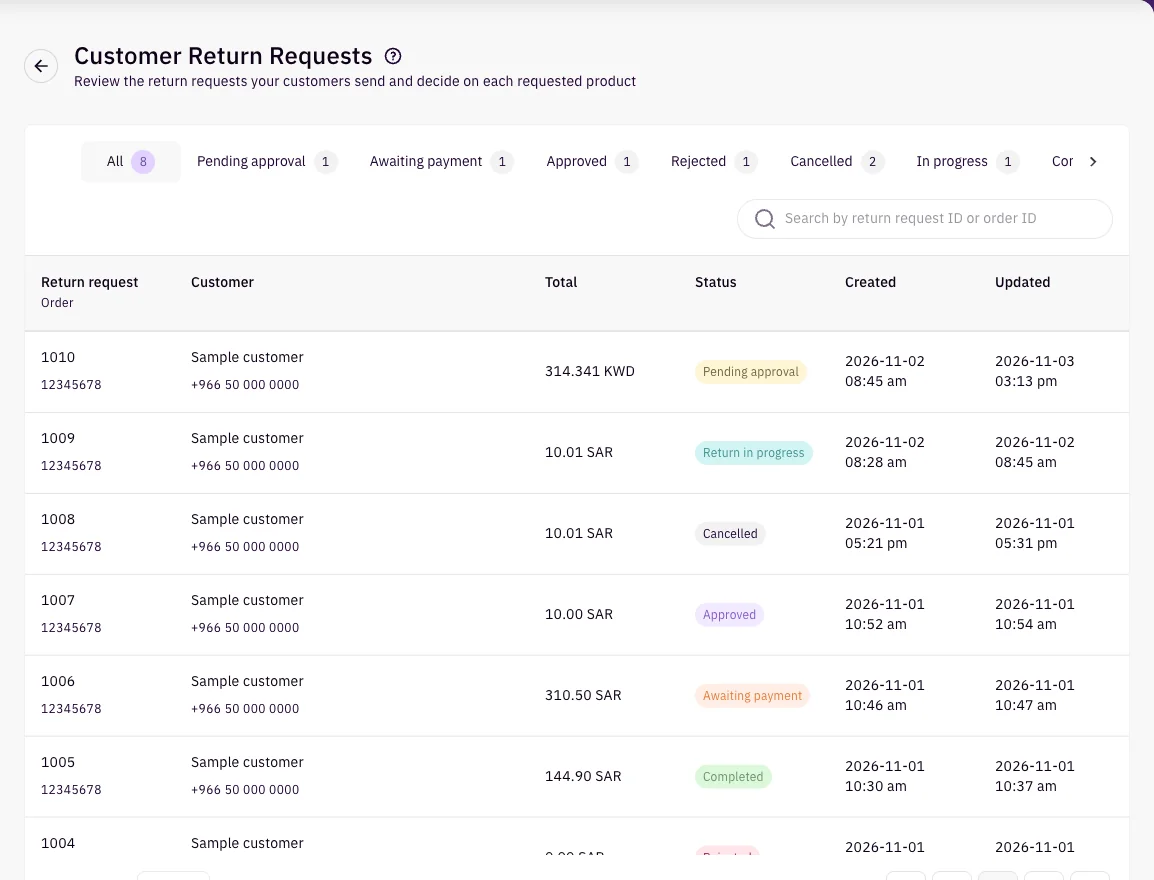
Find a customer return request
Open Orders > Customer Return Requests.
Select a status tab or All. The tab counts cover the store’s requests, even when you search.
Use Search by return request ID or order ID to find a request by either number.
Select the return request number to open it. Select the order number to open the original order instead.
| Column | What you see |
|---|---|
| Return request / Order | The request number and its original order number. Each opens its own details page. |
| Customer | The customer’s name and mobile number. |
| Total | The amount shown for the request. Open the request to see whether this is the requested or expected refund. |
| Status | The request’s current status. |
| Created / Updated | When the request was created and last updated. |
Review products and send your decisions
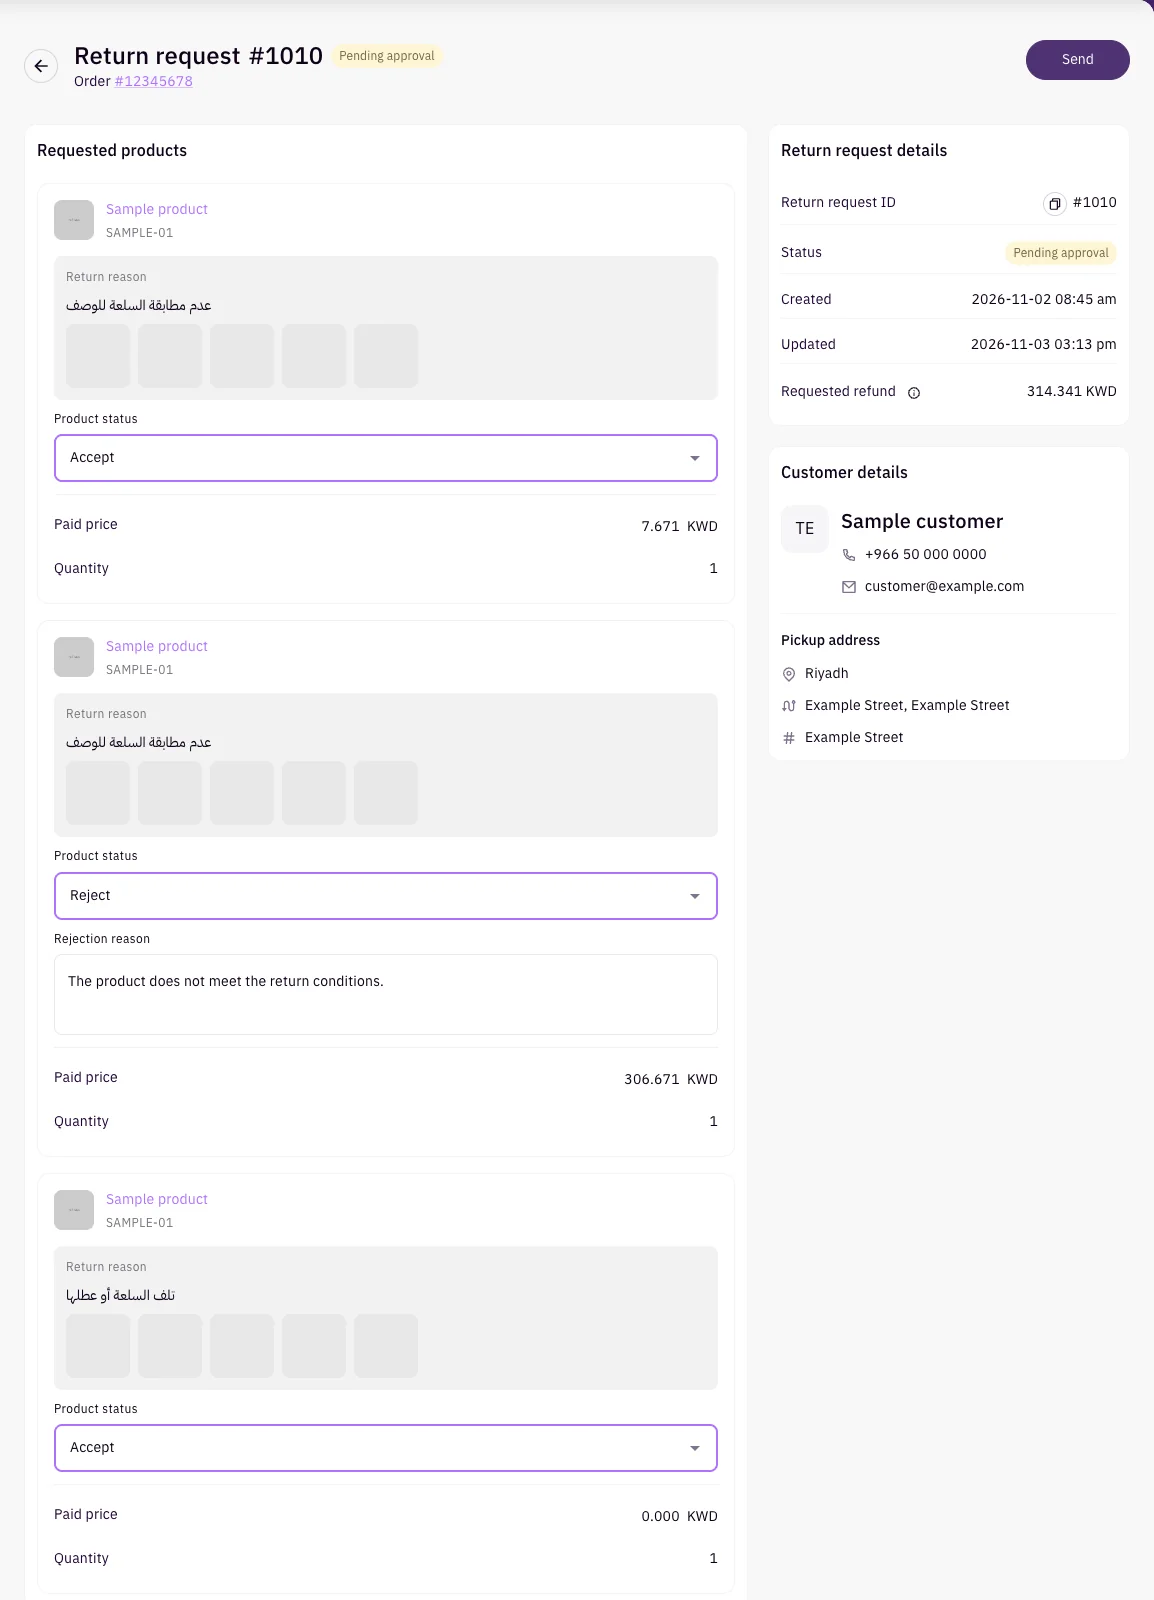
Open a request in Pending approval.
Review Requested products, including Paid price, Quantity and Return reason for each product. When a customer supplies their own reason, it appears under Other.
If a product has a customer photo, select View the customer's photo to inspect it.
Review Customer details and Pickup address. The request’s products, quantities, customer contact and pickup address are read-only on this page.
For every product, choose Accept or Reject under Product status. If you reject a product, you can enter an optional Rejection reason.
Select Send after every product has a decision. Review the saved decisions and the updated request status.
| Amount | Meaning |
|---|---|
| Requested refund | Before decisions, the amount includes all products requested for return. |
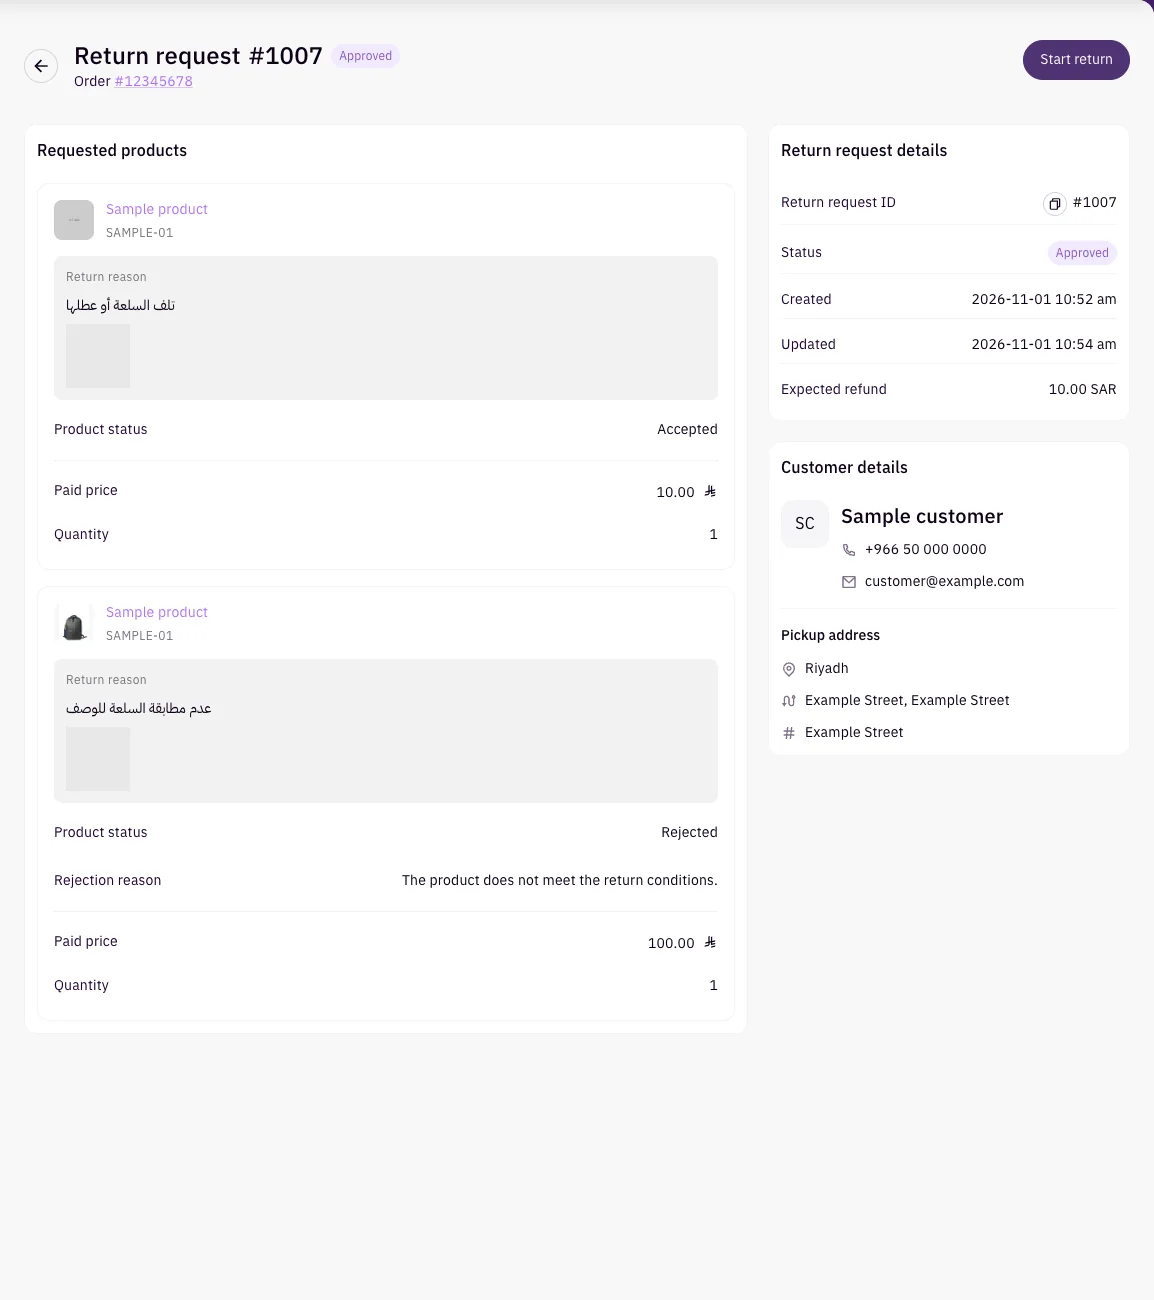
| Expected refund | After decisions, the amount reflects accepted products only. It is not confirmation that money has been refunded. |
Check return fee payment
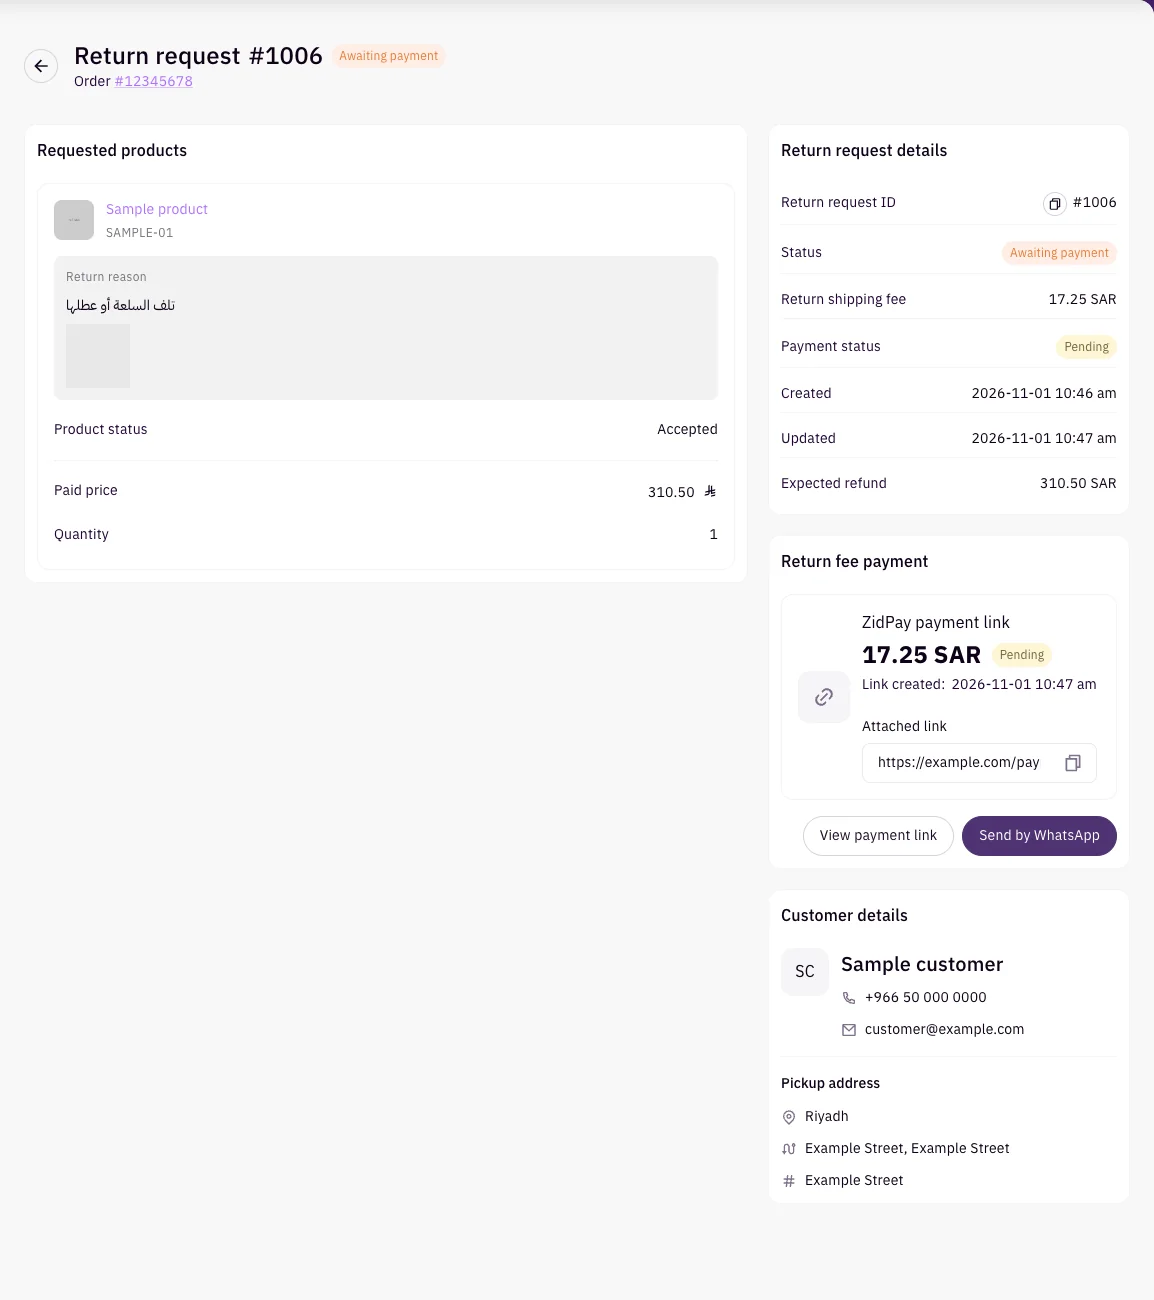
Open the request and check Return shipping fee and Payment status in Return request details, when a fee applies.
If the request has a payment link, review Return fee payment. It shows the fee amount, payment status and Link created. Paid links can also show Payment method and Paid at when payment details are available.
Use the displayed payment link to copy it. Select View payment link to open its details when you have permission.
If Send by WhatsApp is available, use it to share an unpaid, active payment link with the customer.
If payment details fail to load, you can still use View payment link when it is available. Requests awaiting the customer’s fee payment appear under Awaiting payment. Start the return when the request reaches Approved.
Start an approved return
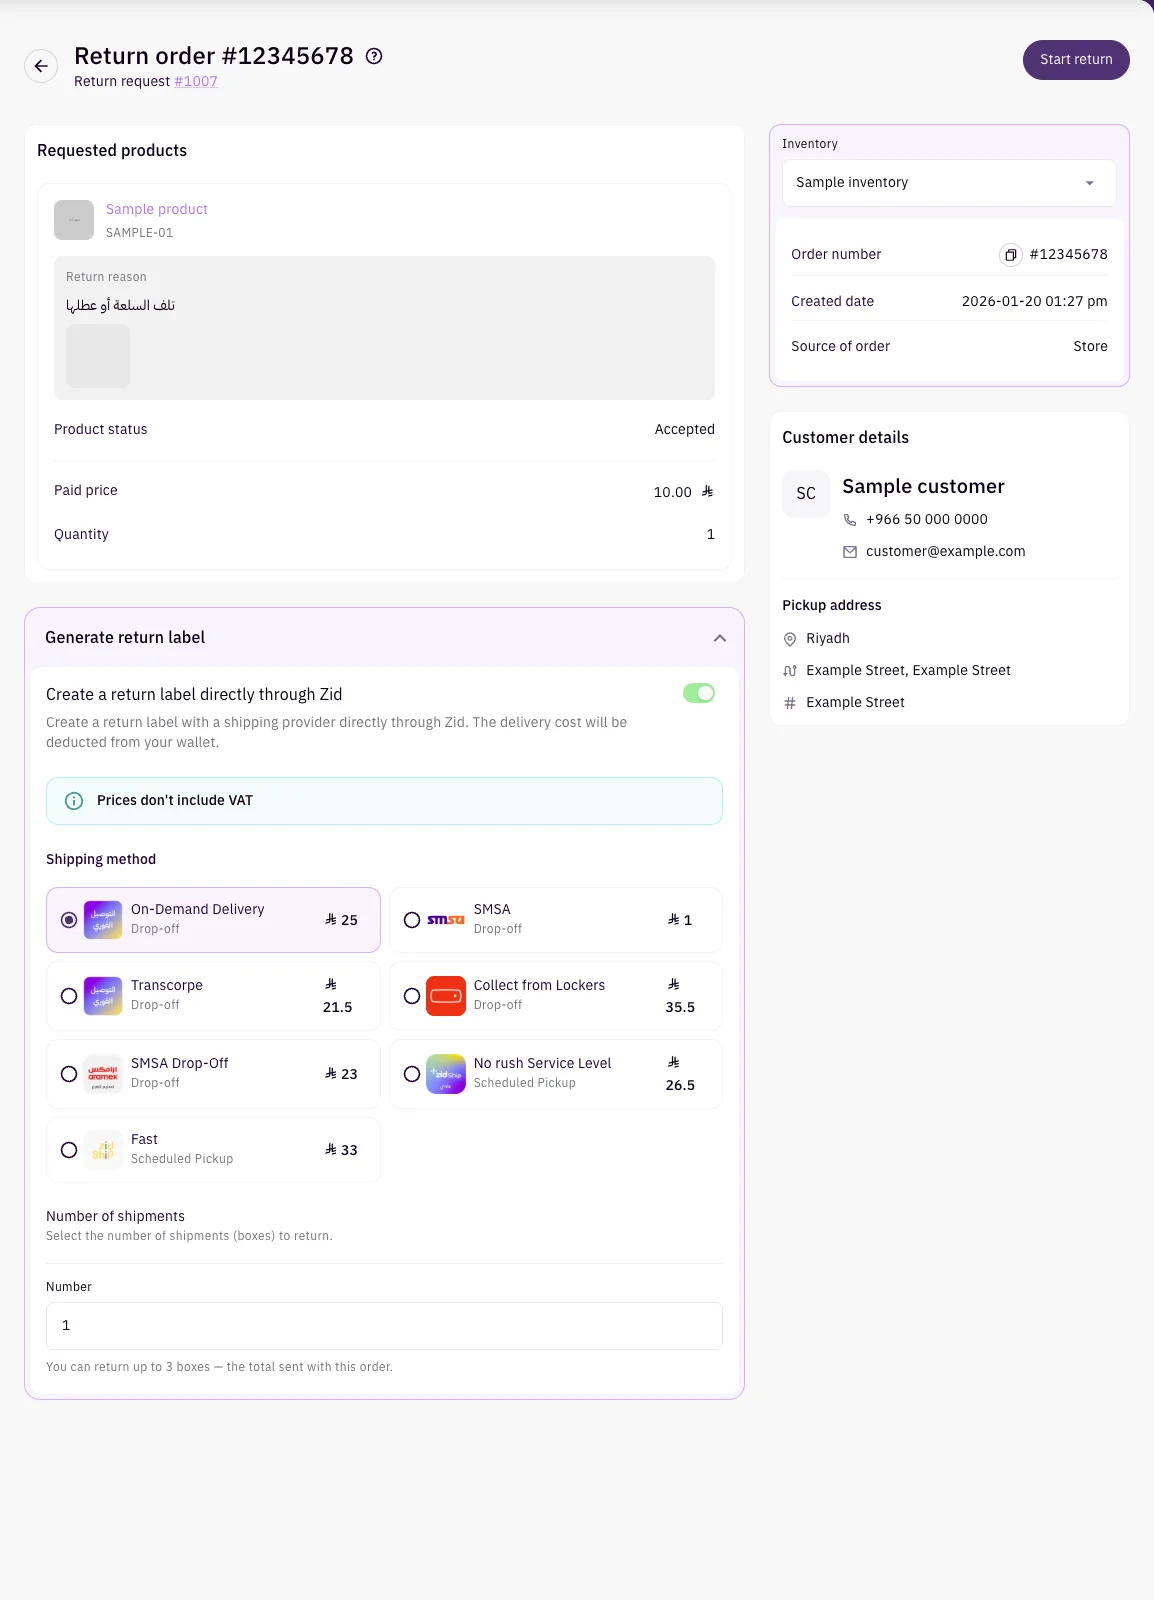
Open the request in Approved and select Start return.
Review the accepted products and their quantities. This flow uses the accepted products and the request’s pickup address; you do not choose the products or reasons again.
Choose Inventory, the location that will receive the returned products.
If you want a label through Zid, turn on Create a return label directly through Zid under Generate return label. Choose Shipping method and enter Number under Number of shipments, within the limit shown on the page.
To arrange shipping yourself, leave label generation off. If no provider is available, complete the return without a label and arrange one with your provider.
Select Start return at the top of the return form. You return to the original order after the return starts.
The original order must still be delivered, the request must be approved, and the request must not already have a return started. Shipping prices shown by the providers exclude VAT. If label generation fails after the return starts, the return remains in progress; open the original order to generate the label again.
Track progress and finish the return
| Request status tab | What to do |
|---|---|
| Pending approval | Review every requested product and send your decisions. |
| Awaiting payment | Check the return fee payment and its payment link. |
| Approved | Open the request and use Start return when you are ready. |
| In progress | Follow the started return from the original order. |
| Completed | Review the completed request and original order. |
| Rejected | Review the saved product decisions and any rejection reasons. |
| Cancelled | Review the cancelled request. |
Receive products and refund the customer
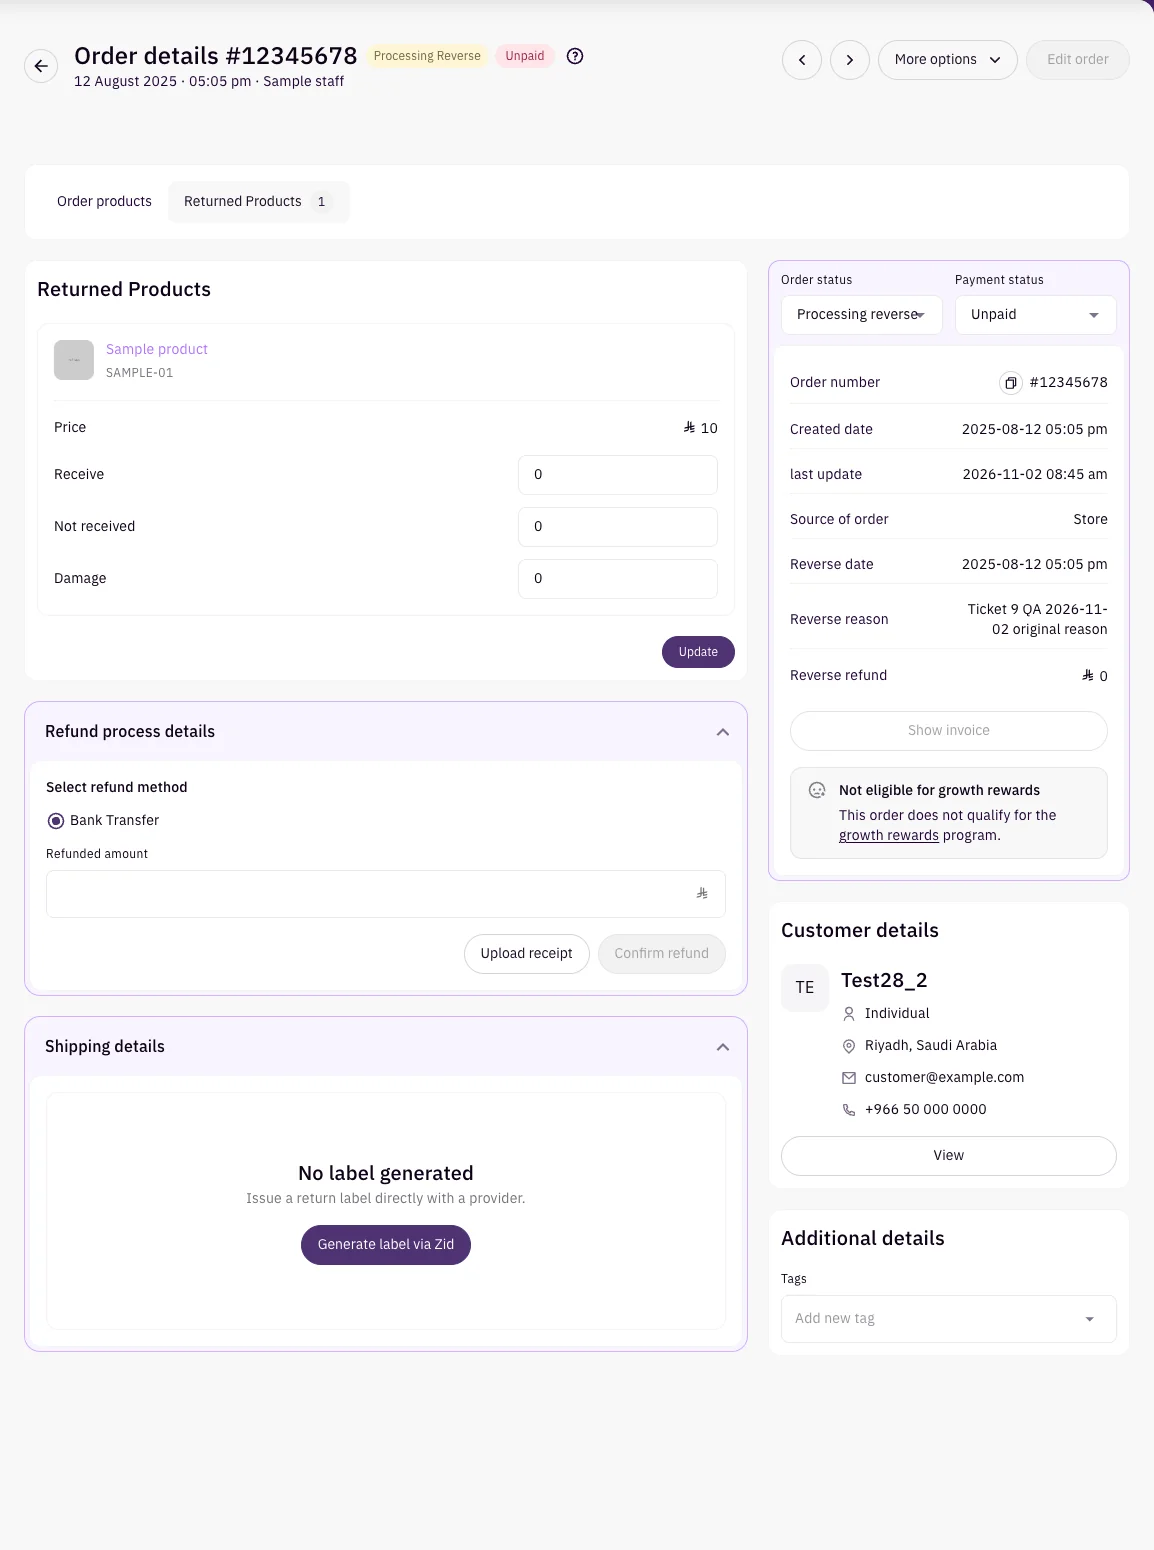
Open the original order and select Returned Products after starting the return.
Record the returned quantity for each product under Receive, Not received and Damage. The three amounts together must not exceed the returned quantity. Select Update while the return is in progress. Only products marked Receive return to the selected inventory.
Check Shipping details. If you need a label and see No label generated, select Generate label via Zid, choose a provider and number of shipments, then select Generate shipping label. When a label exists, use Tracking URL to follow it and Print waybill to give it to the customer.
In Refund process details, choose Select refund method and enter Refunded amount, up to the return total. The available methods depend on the customer’s payment method. For a bank transfer, use Upload receipt if you need to record the receipt and bank information.
Select Confirm refund when you are ready to confirm the refund. Confirm the refund details before proceeding; the method cannot be changed after confirmation.
Follow the order through to completion. See Returns and refunds for the order’s final return statuses and completion rules.
Sending product decisions and starting the return do not confirm a customer refund. Complete the refund from the original order using the appropriate payment method and permissions.
Read Returns and refunds for the detailed receipt, refund and shipping options.
You can also start a direct return from an eligible order without a customer return request. Follow Returns and refunds for that flow.
Still need help?
Our customer service team is ready to help, or find quick answers in the FAQ.